XRAY XTLS REALITY In Docker
This guide will show you have to setup a XRay XTLS REALITY server in Docker everything will be explained as simple as possible so anyone can do it!
Before We Start
This is a proxy server so only HTTP/s traffic is meant for it, and this isn’t a full VPN replacement but your data will be encrypted.
The purpose of this is to bypass internet censorship and advanced DPI.
Your traffic will look like it will be connecting to a popular website like “www.apple.com” but will actually be going to your VPS.
I’m not a security expert and I don’t know how secure this truly is.
Buying The VPS
- I will be buying Vultr they offer a decent server for a cheap price.
- If you plan to use something other than Vultr make sure it’s a reliable, reputable service.
Let’s start by going to Vultr’s website and making a new account.
- Vultr offers $250 USD in credit for free to new customers here.
On your homepage at the top right there will be a “Deploy” button, press that, and press deploy new server.

I’ll be deploying the cheapest option for $5 USD this should be enough for most people, you’ll get 1TB of bandwidth monthly.
Select “Cloud Compute – Shared CPU”.

Select the location, for fast speeds and low ping the closest location to you will be the best.

Choosing the OS is up to you, just pick a standard Linux distribution, I’ll use “Rocky Linux 9”.

For the plan, select “Regular Cloud Compute” and choose the cheapest option. If you get an offer like I did, say “No Thanks”.

On “Additional Features” disable “Auto Backups” then enable “IPv6” and “Limited User Login” which will save you the hassle of creating a user account.

For “Server Settings” you can ignore this for now.

Give the server a hostname and label, this can be whatever you want.

The last thing to do is hit deploy at the bottom.

The server will start deploying, you can see that after you click on the “Compute” tab to the left.


Setting Up Your VPS
SSH Into The VPS
With MacOS or Linux, you can SSH into your VPS by using the terminal.
On Windows, the recommended SSH tool is PuTTY, but PowerShell also has SSH.
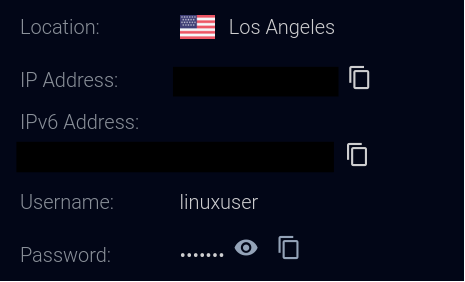
Before you SSH into the VPS, you’ll need the IP and the user password.
Head over to the “Compute” tab and click on your VPS name.
You’ll see the VPS IP address for IPv4 and IPv6 also your user account information.

In terminal, run ssh linuxuser@YOURSERVERIP and enter your password.
Update The VPS
Let’s start off with an update, run sudo dnf upgrade -y and let it finish.
Installing Docker
Don’t install Docker from your distributions repository as it’s usually outdated.
Follow the official guide from Docker here to install it.
Afterwards follow Dockers post installation steps here.
Server NAT
Some VPS providers will put your server behind NAT, you can still use your public IP we just need to check if it’s behind NAT for the Docker container to properly.
In terminal run
ip -4 addr show scope global | grep inet | awk '{print $2}' | cut -d/ -f1 | head -n1.
Keep note of the IP that was outputted.
Firewall Portforward
You need to open port 443/tcp and 80/tcp.
Please refer to Vultr’s documentation if they are your VPS provider. If you use a different VPS provider you need to open up the port from their panel/website.
Docker will bypass the OS firewall so you don’t need to mess with Firewalld or UFW.
Creating the XRay Server
- In this section there will be configuration files that you’ll need to edit, but I’ve left notes on where to edit.
Start by running mkdir data then mkdir data/v2ray
Configuring For Docker
Run nano docker-compose.yml and paste the code below.
services:
  xray:
    image: ghcr.io/xtls/xray-core:latest
    container_name: XRay
    restart: unless-stopped
    volumes:
      - ./data/v2ray/config.json:/usr/local/etc/xray/config.json:ro
    ports:
      - "123.123.123.123:443:443/tcp" # REPLACE "123.123.123.123" WITH OUT OUTPUTTED IP YOU TOOK NOTE OF EARLIER.
    networks:
      bypassnet:
        ipv4_address: 172.20.0.10

networks:
  bypassnet:
    ipam:
      driver: default
      config:
        - subnet: "172.20.0.0/16"
This Docker compose file will run the XRay server on it’s own Docker network so it won’t mess with other potential containers.
Configuring XRay
Start by running docker run –rm ghcr.io/xtls/xray-core x25519 what this does is create a key pair for the encryption.
Back up both keys, the private key is used for the server, the public one for client devices.
Next we create a shortId, run openssl rand -hex 8 back this up also you’ll need it for connecting your client device.
Next run nano data/v2ray/config.json and copy and paste what I’ve left below. You will have to generate a random UUID, you can do that here.
{
  "log": {
    "loglevel": "warning"
  },
  "inbounds": [
    {
      "listen": "172.20.0.30",
      "port": 443,
      "protocol": "vless",
      "settings": {
        "clients": [
          {
            "id": "", # PLACE YOU UUID BETWEEN "".
            "flow": "xtls-rprx-vision"
          }
        ],
        "decryption": "none"
      },
      "streamSettings": {
        "network": "tcp",
        "security": "reality",
        "realitySettings": {
          "show": false,
          "dest": "www.example.com:443", # CHOOSE A WEBSITE THATS POPULAR AND NOT BLOCKED IN YOUR COUNTRY.
          "xver": 0,
          "serverNames": [
            "www.example.com" # CHOOSE A WEBSITE THATS POPULAR AND NOT BLOCKED IN YOUR COUNTRY MAKE SURE ITS THE SAME AS THE FIRST ONE.
          ],
          "privateKey": "", # THE PRIVATE KEY YOU GENERATED EARLIER.
          "shortIds": [
            "" # THE SHORTID YOU GENERATED EARLIER.
          ]
        }
      }
    }
  ],
  "outbounds": [
    {
      "protocol": "freedom"
    }
  ]
}
Save and exit.
Starting The XRay Server
Run docker compose up -d or docker-compose up -d and Docker will start running the container.
After you’ve finished I recommend securing your server.
If the server IP gets blocked try my XRay XHTTP CDN guide here.