Use Shaders On Console Minecraft Preview Without Realms
This guide will show you how to run shaders on Minecraft Preview Console Edition without paying for Realms everything will be 100% free. (You’ll still need a releativley modern PC.)
Setting Up The Preview Minecraft Bedrock Server
Downloading The Server
Head over to the Minecraft Bedrock server download page, download the preview server for your OS.
Running The Server
On the same page follow the instructions on running the server, run it one time so it can generate the world, stop it after it finishes.
Visual Studio Code
If you are anything like me and saw “Visual Studio Code” (VSC) you might’ve thought “Nope”. I promise it’s not that bad. We won’t be doing anything crazy, VSC is going to run a program for editing Minecraft worlds.
Downloading Visual Studio Code
- If you are on Windows download from here.
- If you are on Linux you probably have preferred method but I like the Flatpak.
Open VSC and go to the next step.
Downloading NBT Viewer
Head over to this link.
On the page there’s an “Installation” section, below it a copy button, press it.
Open VSC and press “CTRL + P” and paste, press enter and install NBT Viewer.
Editing The World File
Alright so what are we actually doing? Mojang doesn’t enable the “Deferred Rendering” (Shaders) feature on their Minecraft Bedrock preview servers, but they do on Realms. We are going to enable the feature.
Inside the Minecraft Bedrock server folder head to “Worlds > Bedrock level” find a file named “level.dat” open it in VSC.
In VSC find an “experiments” button and click the plus icon next to it.
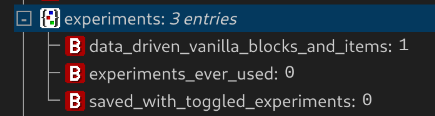
At the top of the page there will be an “add tag” button click it while “experiments” is selected.

Set the name to “deferred_technical_preview” with a value of “1”.

Press “CTRL + S” to save it and close VSC.
Technically everything is ready to go now and the server has “Deferred Rendering” enabled.
Installing Shaders
Now that we’ve enabled shader support server side I’ll show how to install shader packs, in this example I’ll use “Vanilla-PBR“. (You can use whatever you like.)
The pack you downloaded likely has a “.mcpack” extension rename it to “.zip” and extract it.
Move the extracted folder into the “resource_packs” folder, inside the Minecraft Bedrock server folder.
Inside the extracted resource pack folder find a file named “manifest.json” open it and take note of the first uuid and version number.

Head to the “worlds > Bedrock level” folder in the Minecraft Bedrock server folder.
Create a file named “world_resource_packs.json” and paste in what I left below, match the uuid and version to your shader pack.
[
    {
        "pack_id" : "YOUR PACK UUID",
        "version" : [ YOUR PACK VERSION NUMBER ]
    }
]
Save it.
Last thing to do is require texture packs. Inside the Minecraft Bedrock server folder find a file named “server.properties” and open it.
Find a line named “texturepack-required=false” and change it to “texturepack-required=true”. Save and exit.
Finishing Up
Everything is ready to go, start up the server, and on your console (or other devices) it will appear in the LAN games section join and it’ll download the texture pack then you’ll be running with shaders.
If you did this on an external server like a VPS I recommend using phantom to connect to the server.